You can always download the page I use to your hard drive and use it, but to get the most benefit from this start page you need to tweak it to suit your own needs. It's not that difficult to do, a little HTML knowledge helps but is not necessary. There are really three things you will probably want to modify and I'll explain them briefly all below. You can actually use note pad to edit the HTML files used for the start page but I prefer to use a piece of software called Arachnophila to do it. Aside from the fact that Arachnophila has toolbars to help speed up the editing process, it will actually color the HTML tags which makes editing the file a whole lot easier in my opinion. In my opinion this is one of the best HTML editing packages out there and it's free.
Creating New Images
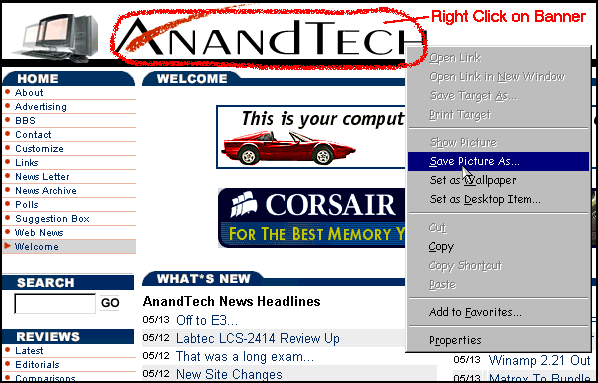
To get the most out of your start page you are going to need to add some of your own sites to it. This is as not as complicated as you might first think. In fact the worst part is actually sizing the image in a graphics package such as MS Paint or Paint Shop Pro. To get the graphic of a favorite web site you need to go to it first and then right click with the mouse on the site's logo. The logo for the site is usually near the top of the page, but you can use any logo or graphic you want to for the start page it's up to you. This will produce a menu similar to the one in the illustration below. Left click on Save Picture As in this menu and save the file to a location you will remember in a few minutes. I have a folder in my root directory called Temporary where I store things like this until I actually use them to make them easier to find later.

That's all there is to capturing a graphic to use as a link on your start page. You will also want to remember the address for the page you are on so you can put it in the HTML code for your start page. The easiest way to save this information for right now, if you're using Internet Explorer is to just drag a shortcut to the same folder you placed the graphic image in before. If you are using Netscape you will probably want to actually bookmark the site or copy and paste the web address into a notepad document. I caution against writing this address down with pencil and paper. It is too easy to make a mistake this way, especially with long web addresses.
After you are done capturing graphics and web page addresses you will want to clean up the graphics and logos you are using. Open up a graphic file with your choice of graphics editors and take a look at what you've captured. Most of the time you can just rescale the image to a smaller size and be done with it. I will explain the basic in a good editor called Paint Shop Pro which you can download a free trial version of. For other graphics editors you will need to refer to the online help for your editor for instructions on how to do this if you don't already know. There are too many graphics editors available for me to be able to cover how to do this on each and every one of these. Paint which is included with Windows will do this but you must specify percentages to shrink by instead of the actual pixel height you want the resulting image to be. So I recommend using something other than Paint for this reason.
I shrink my images to where they only has a height of 30 pixels and let the width scale automatically according to the height I set. You can however make them any size you wish. To bring up the box to do this in Paint Shop Pro click on Image then Resize in the top menu. You will want to click on Custom Size on the right and make sure that Maintain Aspect Ratio is checked. All you need to do then is type in 30 for the second number in the Custom size boxes then press the tab button and follow that by clicking on OK. See the example below.

Congratulations, you have just made an icon for your start page. In some cases the icon may be longer than you want it to be. If this is the case you can uncheck the Maintain Aspect Ratio check box and actually specify a width for the icon to shorten it. You will have to play around with the graphic file for a few times before you actually resize it into something you like. If you have to do this most editors (including Paint Shop Pro) have an Undo button to remove the last operation performed on the image. This will probably come in very handy at times if you do not like the results of your resizing efforts Sometimes you may even want to remove some of the original image so that you are only using the words of the logo, because if you are shrinking the image you are not going to be able to see all of the small details in the image anyway. If you need to do this refer to the online help for your graphics editor to learn how to do edit an image in this manner.
After that you have completed editing the image you will want to save it. It would be a good idea to rename the file while you are doing this because usually the default names are not very descriptive. Also when you save the file you should save it as a .gif file. Most web graphics will probably already be in this format but there are exceptions. The .gif format is smaller than most other types when it comes to the file size, so this will help speed up loading the pages you are creating. It does this by reducing the number of colors used to create the image, and with a small image you really won't notice the difference.
One last note, there are a few web pages that may not have a graphic to use. You can either make your own or make the link just a text description. I will explain more on this subject later.
The last step you need to perform in this process is to copy the graphic you have made to the appropriate directory in the custom start page folder. For example, if you are using the default directories created when you unzip my file to your hard drive and you wanted to put the graphic on the misc page, you would copy the graphic file to the c:\custom start page\misc sites folder.
Editing the Links
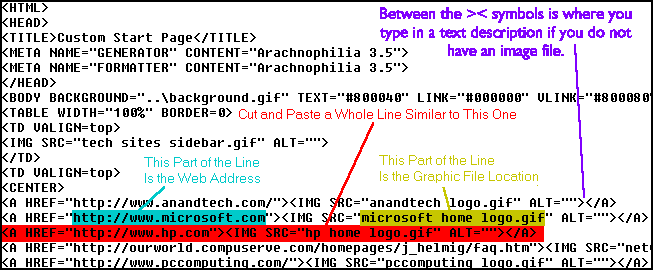
Next you want to edit the actual HTML document that displays in your browser. You need to go to the directory in which you copied the graphic file to. There should be a HTML file with the same name as the folder inside that particular folder. Ex. c:\custom start page\misc sites should have a file called misc.html. The easiest way to add a new link is to just copy an existing line and then paste it back in. After doing this you just change two parts of what you have just pasted back in. See the example below which will show you where all the information for your new link will go in the line you have just copied and pasted. The part highlighted in red is what you want to copy and paste. The blue highlighting shows where you enter the web page address, and the part highlighted in yellow is where you tell it what file to use for the graphic. You will also see a note of where you type a text description should you not have a graphic file to use with your link.
Remember when I told you to save the web page as a shortcut in the same directory as your captured graphic file? This is where it comes in handy. If you right click on the shortcut and the click on properties it will bring up a box with the address to the web page on it. If you have Netscape you can bring up the bookmark or open notepad if you used it to obtain the address and then copy and paste the web address into the HTML file at the appropriate place indicated. After you have inserted links for all of your sites the HTML file you can save and close it.
You're done you should see your new graphic when you open your browser and go to that section in the custom start page. When you click on that link it should take you to the site you copied and pasted into the web address area in the HTML document. If all of this works correctly you can delete the old original captured image file and the shortcuts, bookmarks, or notepad files that contained the web addresses for your sites. You no longer need these.

Creating New Categories
The first step to creating a new category is to make a new button for the menu at the top beside the running dog. To do that you can open one of the button graphics in the c:\custom start page directory with your graphic editor and modify it to read the name of the new category you want. When you have completed this save the new button with a different name from the one you opened and save it in the same directory as the original file.
The next step is to create the new directory where the information for that category will be stored. I'm assuming with this example that you are using the default directories that were originally created when you unzipped the download file. Make a new folder inside of c:\custom start page with the name that describes what you what that category to be. We'll call our example wav file sites. After creating the directory you need to copy an HTML file from one of the other categories into that directory and rename it something like wav file.html. From there all you need to do is remove all the links ,which was what was you cut and pasted (and shown in red) when you created a new web page link, except for one to use as a template. Change the one you left to your first image and link, then copy and paste links for the rest changing the image and web address as needed. When you are done make sure to save the file.
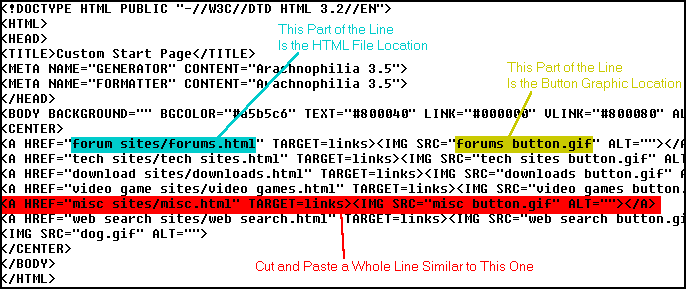
The last step is to open the file c:\custom start page\menu.html with your HTML editor, copy and paste a copy of the line similar to the one shown below in red. This is similar to what we did before when we added a new link. Then you replace the section of the line shown highlighted in blue with the folder and file name of your new categories HTML document, and the part in yellow should be changed to the file name of your new graphic button for the menu at the top. This links the HTML document you have just made to the image button you have made for it.

Conclusion
That's all there is to modifying the base code for my custom start page. If you're new to HTML it may seem a little daunting at first, but after you do a few it becomes a lot easier and I believe the results are well worth the effort. If you are relatively new to this it will probably help if you spend some time looking at the HTML code and comparing it to the actual files before you start modifying. This will help you see and understand what the HTML tags and commands actually do.